Select * from Win32_ComputerSystem where DomainRole = 5
| Value | Meaning |
| 0 | Standalone Workstation |
| 1 | Member Workstation |
| 2 | Standalone Server |
| 3 | Member Server |
| 4 | Backup Domain Controller |
| 5 | Primary Domain Controller |
Step by step process:
This settings automatically configure the W32Time source in regedit
- On a DC, launch Group Policy Management by selecting it from the Tools menu of Server Manager.
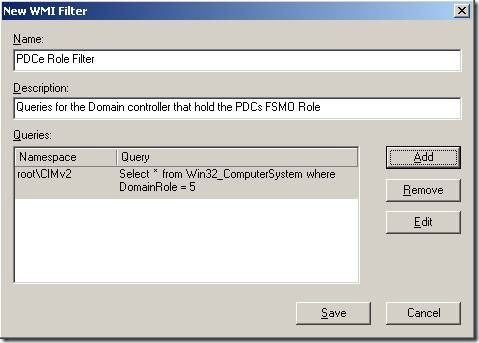
- In the left pane of the Group Policy Management console, right-click WMI Filters and select New.
- In the New WMI Filter window, supply a name for the filter (for example, PDC Emulator WMI Filter). Optionally, supply a description as well.
- Click the Add button.
- Confirm that root\CIMv2 is specified in the Namespace field. (It should be by default.)
- In the Query field, type
Select * from Win32_ComputerSystem where DomainRole=5and click OK. - Click Save to save the filter. Do not close Group Policy Management.
Next, the GPO can be created by following these steps:
- In the left pane of Group Policy Management, right-click Group Policy Objects and select New.
- In the New GPO window, give the new GPO a name and click OK.
- Select Group Policy Objects in the left pane (if not already selected). Right-click the GPO that you created and select Edit.
- In the left pane of Group Policy Management Editor, expand Computer Configuration, Policies, Administrative Templates, System, and Windows Time Service. Select Time Providers.
- Right-click Configure Windows NTP Client and select Edit.
- Select the Enabled radio button.
- From the Type dropdown list, select NTP.
- In the NtpServer field, type the name or IP address of one or more NTP servers. Entries in this list should be separated by spaces, and each entry should have the 0x8 flag appended to it with a comma (for example, pool.ntp.org,0x8 time.windows.com,0x8). Lists of public NTP servers can be found online.
- The other policy settings can typically be left at their default values. Click OK.
- Right-click Enable Windows NTP Client and select Edit.
- Select the Enabled radio button and click OK.
- Close Group Policy Management Editor.
Apply the WMI filter to the GPO by following these steps:
- In the left pane of Group Policy Management, expand Group Policy Objects and select the GPO you created.
- In the center pane, select the Scope tab and scroll down to the WMI Filtering section.
- Click the dropdown menu and select the WMI filter you created earlier. Click Yes to confirm.

Leave a comment